This is my disgusting make up bag. My baby girl got into my dark blue eyeshadow, and everything has been covered in a film of City Night ever since. It has gotten to the point where I am keeping all of the cleaned off makeup by the edge of my sink, just cluttering up my counterspace, so i don't have to put it back in that nasty mess. I really needed a new home for my most used posessions. The more i thought about it, I realized that i never really buy makeup bags. I just stumble upon them. I either get them as a gift, or a bonus with my clinque moisturizer, and i really didn't want to start today. So, I thought, I have all this fabric, I will make a new one. I was starting to worry that it would get dirty and gross, but then i remembered the clear plastic i bought to cover my white kitchen chair cushions and i got excited! I dug it out of the basement and got to work making myself a new, stylish make up clutch, that has a wipeable interior.
HERE'S WHAT YOU NEED:
2 kinds of coordinating fabric (one will only be seen on the inside of the bag so you don't really need it, but if you have extra fabric laying around it is fun when you look inside the bag and see it looking cute in there)
Clear Plasic Vinyl (you can get it by the yard at walmart or joann's)
Sewing Machine
Pins
Velcro (approx 9 inches)
HERE IS HOW I DID IT:
(I tried to be really good at taking pictures so it would be easier to understand, hope it worked)
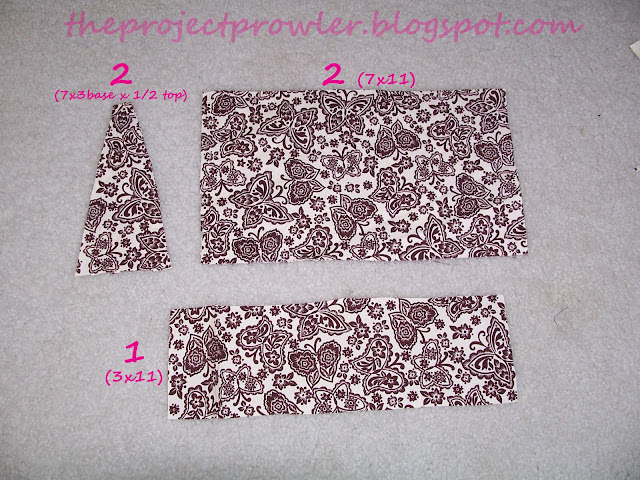
1. Cut out your first fabric, complimentary fabric, and vinyl each with these amounts and sizes (in inches) shown above.
2. Match up the pieces in each fabric and layer the matching pieces together in this order: on bottom, the clear plastic vinyl. In the middle, the fabric you have chosen for the outer fabric. And on top the fabric you chose for your inner fabric.
3. Sitch across the top (one of the long edges) of the two rectangle stacks and the top (the short 1/2 inch side) of the two triangle looking pieces.
4. When you are done stitching, fold the vinyl over so the raw edge is now between the vinyl and the inner fabric, and the top edge is a nice fold. These folded edges will form the top of your makeup bag.
5. Next start piecing it together on the machine. {I would pin it together first, since there are so many layers, so you don't end up having one bunched up wrong.} Attach one triangular shaped side piece to the short side of the large rectangular front piece. And continue around sewing all the 7 inch side together to make your bag edges. The two rectangle pieces will be opposite each other, and the two triangular shaped pieces will be opposie each other. Make sure all those nice folded edges are facing the same direction.
It will look like this at this point when the top part of the bag is all stitched together.
6. Pin the bottom pieces onto the bag. It takes a bit of working and maybe a bit of trimming to get it on there just right. Now sew along the bottom. When you come to a corner, lift up the presserfoot and needle, and reposision the bag on the next straight edge, making sure to sew from edge to edge so that your corners don't end up with little holes.
7. Turn you bag to the right side and work it into the right shape. Then with a zigzag stitch sew approx 9 inches of velcro just inside the top inner edge. Nothing to it. . . ahhh, look at how clean that is!
A little tip: The when i was sewing the bag pieces together the vinyl would sometimes stick to my presserfoot, so i really had to force it along sometimes. I suppose a more meticulous sewer would make some bias tape {click here is a tutorial by the Angry Chicken on bias tape edges} to fold over the the edge you are sewing so it glides easier in the machine, but i just forced it along and it didn't even break my needle!
This lovely picture above will show you that my sewing isn't perfect, but when your makeup is all in there and you have a stylin, sturdy bag you don't even think about the little imperfections that may be on it. So, go clean out that crusty makeup bag {you know you all have one too}and make something new for all those things-you-wouldn't-be-stranded-on-an-island-without to go in.


1 comment:
ummm....Kim I had no idea that you had this awesome craft blog!!!! My friend and I get together once a week and work on craft projects. I'm totally gonna use your blog for ideas from now now on. My first project is going to be this make-up bag, my current one is way too small. You are amazing!! :)
ps. This is Amber from Rick's.
Post a Comment